import polars as pl

metadata = pl.read_parquet('metadata.parquet')Data preprocessing
In this section, we look at the images and create new ones that we save to disk as a preprocessing step.
We also create a Dataset class and instantiate one instance for the training set and one for the evaluation set using the preprocessed images.
Load the metadata DataFrame
base_dir = '<path-of-the-nabirds-dir>'To be replaced by actual path: in our training cluster, the base_dir is at /project/def-sponsor00/nabirds:
base_dir = '/project/def-sponsor00/nabirds'Let’s read our Parquet file back in:
Read in images
To read in the images, there are many options, including:
- PIL.Image.open from Pillow,
cv2.imreadfrom OpenCV,- skimage.io.imread from scikit-image.
Here, we are using imageio.imread from imageio which is an excellent option because it automatically creates a NumPy ndarrays, choosing a dtype based on the image, and it is faster than other options (scikit-image actually uses it now instead of their own implementation).
Initial Dataset class
import os
import imageio.v3 as iio

class NABirdsDataset:
    """NABirds dataset class."""
    def __init__(self, metadata, data_dir):
        self.metadata = metadata
        self.data_dir = data_dir
    def __len__(self):
        return len(self.metadata)
    def __getitem__(self, idx):
        path = os.path.join(
            self.data_dir,
            self.metadata.get_column('path')[idx]
        )
        img = iio.imread(path)
        species_name = self.metadata.get_column('species_name')[idx]
        species_id = self.metadata.get_column('species_id')[idx]
        photographer = self.metadata.get_column('photographer')[idx]
        bbx = self.metadata.get_column('bb_x')[idx]
        bby = self.metadata.get_column('bb_y')[idx]
        bbw = self.metadata.get_column('bb_width')[idx]
        bbh = self.metadata.get_column('bb_height')[idx]
        element = {
            'img': img,
            'species_name': species_name,
            'species_id': species_id,
            'photographer': photographer,
            'bbx' : bbx,
            'bby' : bby,
            'bbw' : bbw,
            'bbh' : bbh
        }
return elementInstantiate initial class
img_dir = os.path.join(base_dir, 'images')

nabirds_initial = NABirdsDataset(
    metadata,
    img_dir
)
Print an element
next(iter(nabirds_initial)){'img': array([[[ 48, 46, 49],
[ 52, 50, 53],
[ 54, 52, 53],
...,
[ 84, 84, 82],
[ 86, 86, 84],
[ 90, 90, 88]],
[[ 47, 45, 48],
[ 50, 48, 51],
[ 52, 50, 51],
...,
[ 84, 84, 82],
[ 85, 85, 83],
[ 88, 88, 86]],
[[ 51, 49, 50],
[ 53, 51, 52],
[ 54, 52, 53],
...,
[ 83, 83, 81],
[ 83, 83, 81],
[ 87, 87, 85]],
...,
[[222, 221, 226],
[221, 220, 225],
[221, 220, 225],
...,
[ 88, 88, 88],
[ 87, 85, 88],
[ 89, 87, 90]],
[[220, 219, 224],
[220, 219, 224],
[220, 219, 224],
...,
[ 88, 88, 88],
[ 86, 84, 87],
[ 88, 86, 89]],
[[220, 219, 224],
[220, 219, 224],
[220, 219, 224],
...,
[ 88, 88, 88],
[ 85, 83, 86],
[ 87, 85, 88]]], shape=(341, 296, 3), dtype=uint8),
'species_name': 'Oak Titmouse',
'species_id': 260,
'photographer': 'Ruth Cantwell',
'bbx': 83,
'bby': 59,
'bbw': 128,
'bbh': 228}Note the image values between 0 and 255.
Display a sample of data
Let’s display the first 4 images and their bounding boxes (remember that we have to display the photographers names as a requirement of this dataset):
import matplotlib.pyplot as plt
import matplotlib.patches as patches

fig = plt.figure(figsize=(7.2, 9))

for i, element in enumerate(nabirds_initial):
    ax = plt.subplot(2, 2, i + 1)
    plt.tight_layout()
    ax.set_title(
        f"""
        {element['species_name']}
        Picture by {element['photographer']}
        """,
        fontsize=9,
        linespacing=1.5
    )
    ax.axis('off')
    plt.imshow(element['img'])
    rect = patches.Rectangle(
        (element['bbx'], element['bby']),
        element['bbw'],
        element['bbh'],
        linewidth=1,
        edgecolor='r',
        facecolor='none'
    )
    ax.add_patch(rect)
    if i == 3:
        plt.show()
        break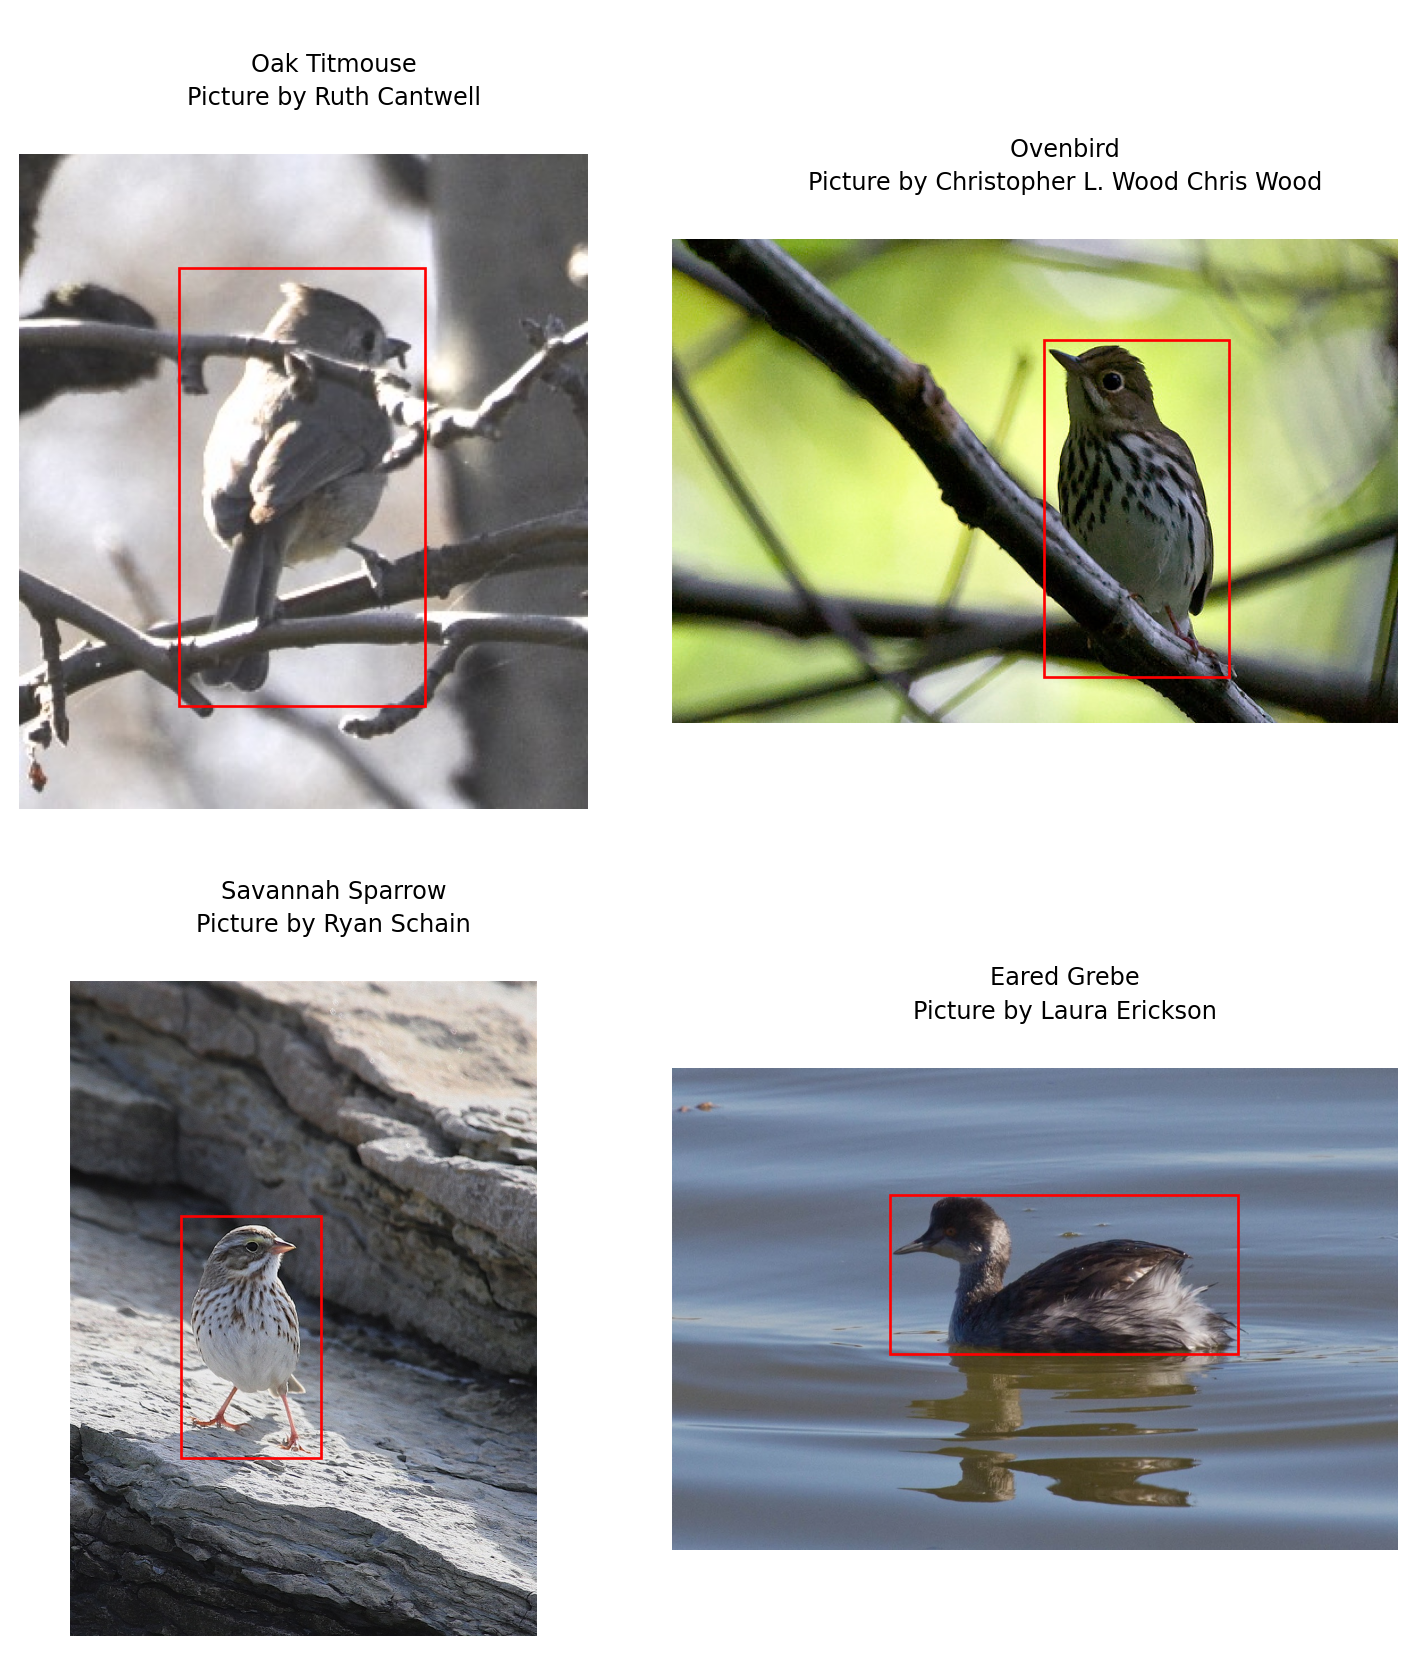
Print info on a sample of data
for i, element in enumerate(nabirds_initial):
    print(f"Image dimensions: {element['img'].shape}, "
          "data type: {element['img'].dtype}")
    if i == 3:
        break
Image dimensions: (341, 296, 3), data type: {element['img'].dtype}
Image dimensions: (427, 640, 3), data type: {element['img'].dtype}
Image dimensions: (1024, 730, 3), data type: {element['img'].dtype}
Image dimensions: (680, 1024, 3), data type: {element['img'].dtype}Notice how the images are all of different sizes. This is a problem because neural networks need images of the same size.
We are also not making use of the bounding boxes this dataset comes with. This means that we have a large number of pixels we know do not contain any bird part.
Lastly, our images are fairly large (often up to 1024 pixels in width or height). Classification models often come with a few variants for a handful of different image sizes, but the most standard size is 224 by 224 (good compromise between detail and speed).
Cleaning Dataset class
We want to crop the unnecessary parts of images, then resize them (without distortion that could invalidate the labels) to a size of 224 x 224. We will treat the training and evaluation images differently.
We want to randomly crop the training images as one of our augmentation technique. We want the randomly cropped images to be 224 x 224. So we don’t want to resize them to 224 x 224 before the random crops or they’ll end up smaller, then re-enlarged and we will loose some resolution unnecessarily. So instead we crop them to the bounding box with an additional 20% margin and resize them to 269 x 269. the random crop will bring them back to the final size of 224 x 224.
For the evaluation set, we crop to the bounding boxes (no margin) and directly resize to 224 x 224.
Then we will save all the images to files since this step only needs to happen once (remember our strategy).
We could write a function to clean our images, but another more elegant approach, is to create a class.
To downsize the images without distortion, we use skimage.transform.resize.
from skimage.transform import resize
import numpy as np

class CleaningDataset:
    """Cleaning dataset class."""
    def __init__(self, metadata, source_dir, target_dir, target_size, margin_factor):
        self.metadata = metadata
        self.source_dir = source_dir
        self.target_dir = target_dir
        self.target_size = target_size
        self.margin_factor = margin_factor

    def __len__(self):
        return len(self.metadata)

    def __getitem__(self, idx):
        """Returns cropped, resized image and save path."""

        # Build paths
        read_path = os.path.join(
            self.source_dir,
            self.metadata.get_column('path')[idx]
        )
        save_path = os.path.join(
            self.target_dir,
            self.metadata.get_column('path')[idx]
        )

        # Load image
        try:
            img = iio.imread(read_path)
        except Exception as e:
            print(f"Error loading {filename}: {e}")
            return None, None

        # If a file has an alpha channel, drop it
1        if img.shape[2] == 4:
            img = img[:,:,:3]

        # Get bounding box data
        bbx = self.metadata.get_column('bb_x')[idx]
        bby = self.metadata.get_column('bb_y')[idx]
        bbw = self.metadata.get_column('bb_width')[idx]
        bbh = self.metadata.get_column('bb_height')[idx]

        # Crop image with a 20% margin:
        # 1. Get the image dimensions (to make sure we don't go out of bounds)
        height, width = img.shape[:2]

        # 2. Calculate the margin size
        # We use int() because pixel coordinates must be integers
        margin_w = int(bbw * self.margin_factor)
        margin_h = int(bbh * self.margin_factor)

        # 3. Calculate the new coordinates with the margin
        x1 = bbx - margin_w
        y1 = bby - margin_h
        x2 = bbx + bbw + margin_w
        y2 = bby + bbh + margin_h

        # 4. Set limits to coordinates to ensure they stay inside the image
        # x1 and y1 cannot be less than 0
        # x2 and y2 cannot be larger than the image width/height
        x1 = max(0, x1)
        y1 = max(0, y1)
        x2 = min(width, x2)
        y2 = min(height, y2)

        # 5. Crop
        img_cropped = img[y1:y2, x1:x2]

        # 6. Resize
        # Resize img to target size with padding to avoid distortion
        h, w, _ = img_cropped.shape
        target_h = target_w = self.target_size

        # Calculate the scaling factor to fit the image inside the box
        scale = min(target_h / h, target_w / w)

        # Calculate the new dimensions of the image
        new_h, new_w = int(h * scale), int(w * scale)

        # Resize
        img_resized = resize(img_cropped, (new_h, new_w), anti_aliasing=True)

        # Create a black canvas (zeros) of the target size
        out_img = np.zeros(
            (target_h, target_w, img.shape[2]),
            dtype=img_resized.dtype
        )

        # Place the resized image in the center of the canvas
        y_offset = (target_h - new_h) // 2
        x_offset = (target_w - new_w) // 2
        out_img[y_offset:y_offset+new_h, x_offset:x_offset+new_w] = img_resized

        # Convert back to uint8 (0-255)
2        final_img = (out_img * 255).astype(np.uint8)

return final_img, save_path- 1
- Reason for this step: see note below.
- 2
-
skimagereturns elements with adtype(float64)(values from 0 to 1), but we want to save space on disk.
Even serious, well curated datasets often contain inconsistent or erroneous data. After playing with this dataset, I realized that at least one image has 4 channels (RGBA, i.e. RGB and the alpha channel). This means that its NumPy array version has 4 instead of 3 dimensions…
This didn’t make any sense to me since all the images were JPEG (it is easy to verify that with command line utilities such as fd) and JPEG images do not have an alpha channel.
So I wrote a function that would return the path of the (first) image with an extra channel and I got 0344/3b69ce35b9404f3eb321100c93dd2b43.jpg.
It appears to be a JPEG image. However, when passing it to the identify command from ImageMagick, I realized that it was in fact a PNG image mislabelled as a JPEG…
Here is an equivalent way to show this in Python:
from PIL import Image

img = os.path.join(img_dir, '0344/3b69ce35b9404f3eb321100c93dd2b43.jpg')

with Image.open(img) as img:
    print(f"The actual format of the image is {img.format}.")
The actual format of the image is PNG.Create the clean data in parallel
Built-in multiprocessing in Python can be done with either of the ProcessPoolExecutor class from the concurrent.futures module or the Pool class from the multiprocessing package.
Let’s use the first one:
from concurrent.futures import ProcessPoolExecutor
from tqdm import tqdm  # to display a progress bar
Let’s instantiate our CleaningDataset for the training set:
cleaned_img_dir = os.path.join(base_dir, 'cleaned_images')

# Filter only training set from the metadata DataFrame:
metadata_train = metadata.filter(pl.col('is_training_img') == 1)

train_dataset_to_clean = CleaningDataset(
    metadata=metadata_train,
    source_dir=img_dir,
    target_dir=cleaned_img_dir,
    target_size=269,              # 224 with a 20% margin
    margin_factor=0.2
)
And let’s create an instance for the validation set:
# Filter the validation metadata in our DataFrame:
metadata_val = metadata.filter(pl.col('is_training_img') == 0)

val_dataset_to_clean = CleaningDataset(
    metadata=metadata_val,
    source_dir=img_dir,
    target_dir=cleaned_img_dir,
    target_size=224,
    margin_factor=0
)
We can now create helper functions:
def process_train_idx(i):
    """Helper function for the parallel worker."""
    img, path = train_dataset_to_clean[i]
    if img is not None:
        # Create target directory if it doesn't exist
        os.makedirs(os.path.dirname(path), exist_ok=True)
        # Save cleaned image
        iio.imwrite(path, img)
        return 1 # Success
    return 0 # Failure


def process_val_idx(i):
    """Helper function for the parallel worker."""
    img, path = val_dataset_to_clean[i]
    if img is not None:
        # Create target directory if it doesn't exist
        os.makedirs(os.path.dirname(path), exist_ok=True)
        # Save cleaned image
        iio.imwrite(path, img)
        return 1 # Success
    return 0 # Failure
And run them in parallel:
Note that you will not be able to run the actual processing chunks:
- Cropping and resizing 50,000 images takes a lot on the CPUs and if we do it all, we will probably crash the cluster.
- Additionally, we would all be trying to write to the same path, creating weird file conflicts.
I ran this ahead of time and already created the cropped and resized files and I did not give you write access to the dataset.
If you want to run the code and experiment with various numbers of CPUs, you can do this later on your machine or on a production cluster.
Don't try to run this chunk in the training cluster.
# Use as many workers as you have CPU cores
with ProcessPoolExecutor() as executor:
    # Map indices to the process function
    results = list(tqdm(
        executor.map(process_train_idx, range(len(train_dataset_to_clean))),
        total=len(train_dataset_to_clean),
        desc='Cleaning Images'
    ))

print(f"Done. {sum(results)} training images processed.")
Done. 23929 training images processed.Don't try to run this chunk in the training cluster.
# Use as many workers as you have CPU cores
with ProcessPoolExecutor() as executor:
# Map indices to the process function
results = list(tqdm(
executor.map(process_val_idx, range(len(val_dataset_to_clean))),
total=len(val_dataset_to_clean),
desc='Cleaning Images'
))
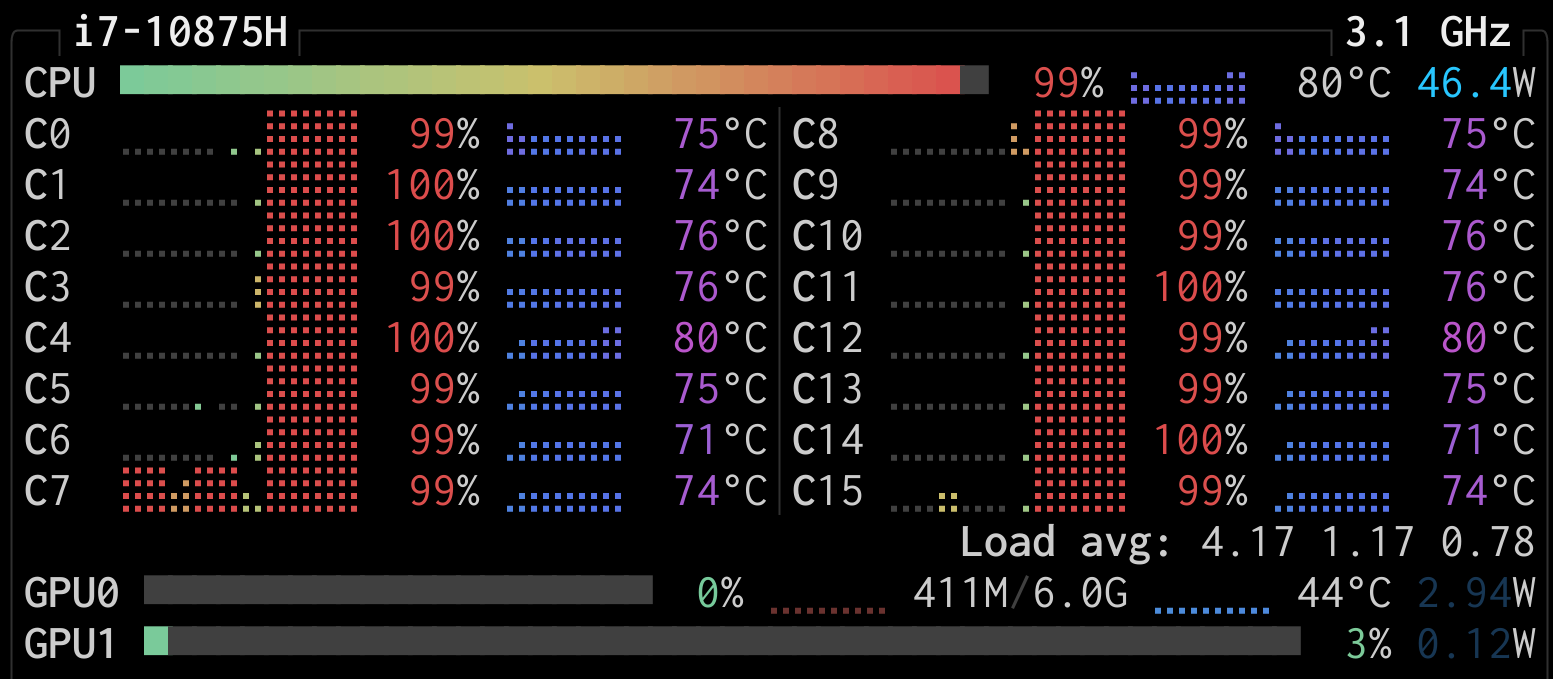
print(f"Done. {sum(results)} validation images processed.")Done. 24633 validation images processed.You can watch the parallel work live with an application such as htop (on your machine or the cluster) or btop (on your machine).
Here is a screenshot I took from btop on my machine while creating the cleaned images. You can see that my 16 cores are working in parallel:
Final Dataset class
Now we can create a new, simplified Dataset class (we don’t need the bounding boxes anymore):
class NABirdsDataset:
    """NABirds dataset class."""
    def __init__(self, metadata, data_dir):
        self.metadata = metadata
        self.data_dir = data_dir

    def __len__(self):
        return len(self.metadata)

    def __getitem__(self, idx):
        path = os.path.join(self.data_dir, self.metadata.get_column('path')[idx])
        img = iio.imread(path)
        species_name = self.metadata.get_column('species_name')[idx]
        species_id = self.metadata.get_column('species_id')[idx]
        photographer = self.metadata.get_column('photographer')[idx]
        element = {
            'img': img,
            'species_name': species_name,
            'species_id': species_id,
            'photographer': photographer,
        }

        return element
Training set
We instantiate this Dataset class with the training set, using the cropped and resized images:
# Create Dataset class instance:
nabirds_train = NABirdsDataset(metadata_train, cleaned_img_dir)
Validation set
And for the validation set, we need to instantiate a Dataset class with our validation data on the cropped and resized images:
# Instantiate a Dataset class with the validation data:
nabirds_val = NABirdsDataset(metadata_val, cleaned_img_dir)
Print info on samples
Let’s print info on a sample of our training set:
for i, element in enumerate(nabirds_train):
    print(f"Image new dimensions: {element['img'].shape}, "
          "data type: {element['img'].dtype}")
    if i == 3:
        break
Image new dimensions: (269, 269, 3), data type: {element['img'].dtype}
Image new dimensions: (269, 269, 3), data type: {element['img'].dtype}
Image new dimensions: (269, 269, 3), data type: {element['img'].dtype}
Image new dimensions: (269, 269, 3), data type: {element['img'].dtype}Notice that all the images are now of the same size: 269 x 269.
And on a sample of our evaluation set:
for i, element in enumerate(nabirds_val):
    print(f"Image new dimensions: {element['img'].shape}, "
          "data type: {element['img'].dtype}")
    if i == 3:
        break
Image new dimensions: (224, 224, 3), data type: {element['img'].dtype}
Image new dimensions: (224, 224, 3), data type: {element['img'].dtype}
Image new dimensions: (224, 224, 3), data type: {element['img'].dtype}
Image new dimensions: (224, 224, 3), data type: {element['img'].dtype}Notice that all the images are now of the same size: 224 x 224.
Display samples
Let’s display the first 4 cleaned images in our training set to make sure they look like what we expect:
fig = plt.figure(figsize=(7.2, 9))

for i, element in enumerate(nabirds_train):
    ax = plt.subplot(2, 2, i + 1)
    plt.tight_layout()
    ax.set_title(
        f"""
        {element['species_name']}
        Picture by {element['photographer']}
        """,
        fontsize=9,
        linespacing=1.5
    )
    ax.axis('off')
    plt.imshow(element['img'])
    if i == 3:
        plt.show()
        break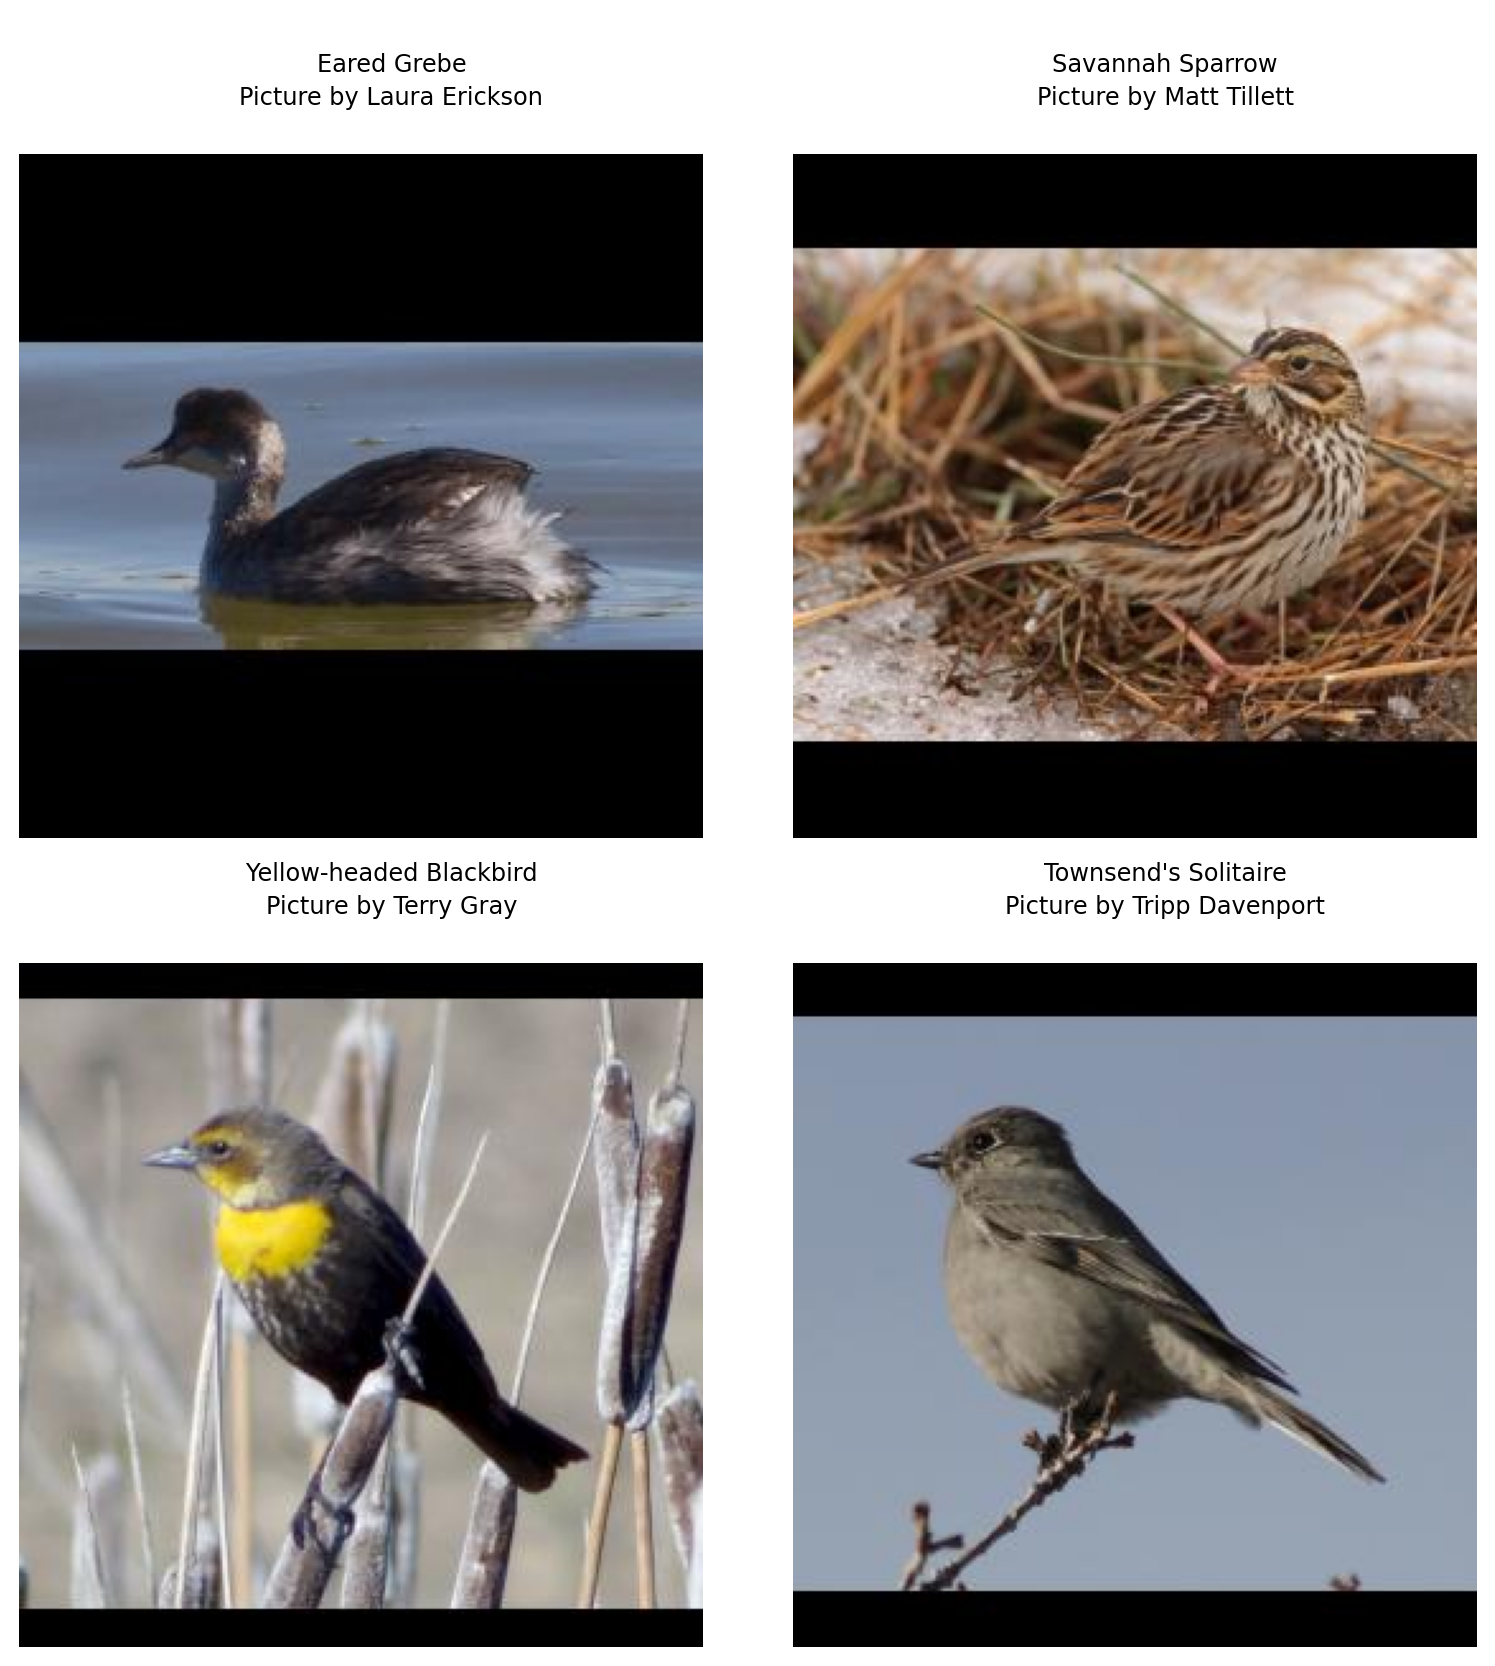
Notice the lower resolution (since we downsized) compared to the first few images we displayed. This resolution is still adequate (the distinctive bird features are still perfectly visible).
Notice also the margin around the birds.
And let’s do the same for the evaluation set:
fig = plt.figure(figsize=(7.2, 9))

for i, element in enumerate(nabirds_val):
    ax = plt.subplot(2, 2, i + 1)
    plt.tight_layout()
    ax.set_title(
        f"""
        {element['species_name']}
        Picture by {element['photographer']}
        """,
        fontsize=9,
        linespacing=1.5
    )
    ax.axis('off')
    plt.imshow(element['img'])
    if i == 3:
        plt.show()
        break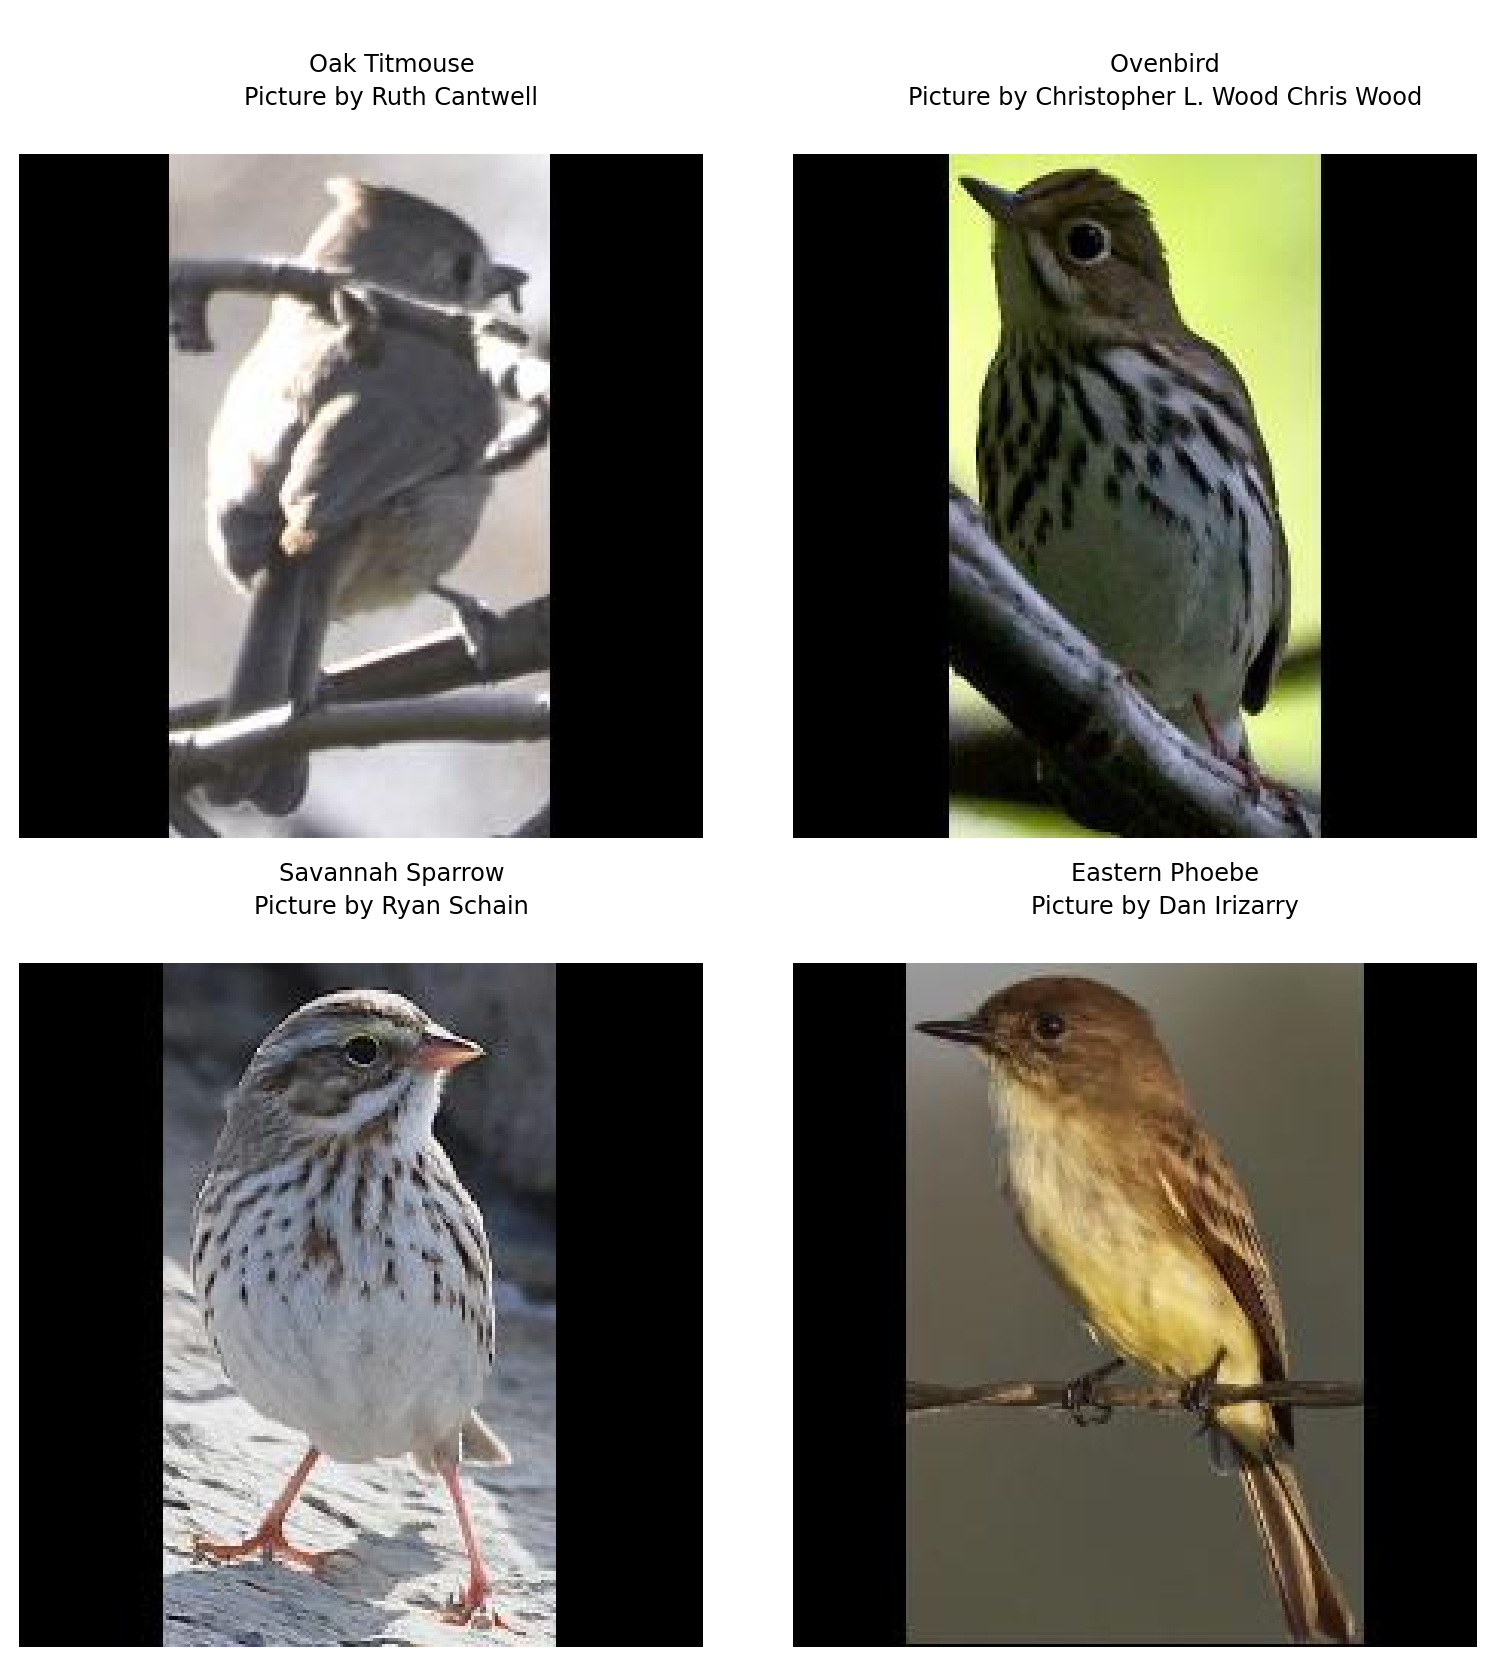
Notice how the cropping was done without margin on the evaluation set (matching the bounding boxes just around the birds).